My family and relatives spent the day after Christmas at a park close to home. Each family brought their own share of food. I brought dessert!
I discovered this brownie recipe while browsing online. I modified the recipe a little. The chocolate and butter were melted together. Eggs, sugar and honey mixture, and vanilla were beaten at hi-speed for about 10 minutes until light and fluffy. The chocolate mixture, flour and salt were blended in to the egg mixture. Chocolate chips were stirred in to the batter and then baked for 30 minutes at 160 degrees Celcius. It was cooled completely before frosting. Melted white chocolate was used to decorate the top.
As soon as I removed the plastic lid, everyone gathered round me to ask for their portion.
Pages
▼
December 22, 2010
Gingerbread Treats
A week before Christmas break, my sister and her colleagues at NIVA International Kindergarten made an agreement to include their students in their gift-giving. Each teacher picked a day when she would want to give her gifts. My sister picked the last day before the break. When she got home, she asked me to help her decide what to give. I convinced her to give something with a touch of Christmas. After some minutes of discussion, we settled on Gingerbread Christmas Tree cookie.
I combined 2 pounds of flour, 4 teaspoons of ground ginger, 2 teaspoons of ground cinnamon, a dash of nutmeg and 4 teaspoons of baking soda. I sifted them together into a large bowl. I placed the butter, syrup/honey and sugar over low heat and stirred the mixture until the butter melted. I poured the mixture into the dry ingredients, added the eggs and mixed them with a wooden spoon until a dough was formed. On a lightly floured surface, I kneaded the dough for a bit and rolled it out until 3 mm thick. I stamped out Christmas tree shape with my cookie cutter and baked them at 160 degrees Celcius for 15-20 minutes or just until lightly browned.
Ready to bake...
After cooling them for a few minutes, I dipped the top side of the cookie in a melted dark chocolate and used royal icing to pipe the border. I arranged them in a cookie sheet , covered them with cling film and chilled for a day before packing.
I combined 2 pounds of flour, 4 teaspoons of ground ginger, 2 teaspoons of ground cinnamon, a dash of nutmeg and 4 teaspoons of baking soda. I sifted them together into a large bowl. I placed the butter, syrup/honey and sugar over low heat and stirred the mixture until the butter melted. I poured the mixture into the dry ingredients, added the eggs and mixed them with a wooden spoon until a dough was formed. On a lightly floured surface, I kneaded the dough for a bit and rolled it out until 3 mm thick. I stamped out Christmas tree shape with my cookie cutter and baked them at 160 degrees Celcius for 15-20 minutes or just until lightly browned.
Add caption |
Ready to bake...
After cooling them for a few minutes, I dipped the top side of the cookie in a melted dark chocolate and used royal icing to pipe the border. I arranged them in a cookie sheet , covered them with cling film and chilled for a day before packing.
50 plastic boxes of Gingerbread and marshmallow treats were packed! They turned out well. The kids loved them!
December 20, 2010
Seung Jay's Birthday Cupcakes
Every year Sueng Jay celebrates his birthday at NIVA International Kindergarten in a unique style. This year Mc Donalds catered. To make the party more entertaining to kids, his mother, a good friend of ours, came up with an idea to give each student a cupcake to decorate. Since a friend and classmate at Le Cordon Bleu Culinary School was already making his birthday cake, I was asked to do the fifty cupcakes. Thirty with blue frosting for the boys and 20 with pink frosting for the girls.
Cupcake from Little Home
I was asked to make cupcakes for a birthday boy who goes to school where my sister works. The mother requested a cupcake without any decorations but frosting. To get a picture of how it's supposed to look like, I went to a mall nearby and scout out for as many cupcakes as I could in all the bakeries in there . After minutes of searching, I found this cute cupcake from Little Home bakery.
The cupcake itself was soft and nice but I didn't like the margarine taste in its frosting. Well, at least I got an idea.
Cute eh?
The cupcake itself was soft and nice but I didn't like the margarine taste in its frosting. Well, at least I got an idea.
Cute eh?
December 2, 2010
Brunch
I was feeling too lazy today that I got out of bed at 10. I wasn't in the mood to cook. I checked the fridge to look for something that I could just reheat. When I saw the leftover veggies from the salad last night, an idea to make a sandwich came to mind. Making a sandwich is not much of a hassle.
I warmed the bread up, spread the salad cream on one slice, yes, salad cream. I like experimenting on the things I eat. I arranged the Julienne sliced carrots, lettuce, veggie meat and 2 slices of cheese on top and Voila! I had a big sandwich for brunch. It was gone in a few minutes. I was full and satisfied. It kept me going for a few hours and had late lunch.
Bruschetta
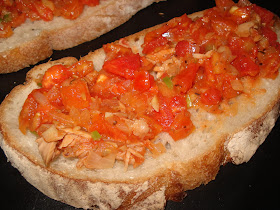
We purchased a freshly baked Pain de Campagne in our recent trip to our favorite bakery. As soon as I got home, I started making my own version of bruschetta.
For the topping, I sauteed the finely minced garlic, chopped onion and tomatoes. Just seconds before removing the pan from heat, I added the tuna and mixed it. I seasoned it with salt and pepper and sprinkled it with mixed herbs and spices. I scooped it into the sliced bread, covered the topping with grated quickmelt cheese and baked at 160 degrees Celcius for 10 minutes. I took them out of the oven when the cheese melted.
The crunchiness of the bread and the softness of the topping were just perfect.
November 29, 2010
Birthday cupcakes
Last weekend I got an invite to a relative's daughter's birthday party. Still tired from my trips to the hospital for my medical exam I couldn't make up my mind what to get her so I decided to make cupcakes for the birthday girl.
The recipe is based on Martha Stewart's vanilla summer cupcakes. Instead of using the Swiss-meringue buttercream, I opted for a much simpler frosting. I substituted half the amount of butter that the recipe called for with shortening. I creamed the butter and shortening mixture with 4 tablespoons of milk and added pure vanilla extract. When the mixture became fluffy, I added melted white chocolate and icing sugar alternately. I added 4 TBSP of milk again when the frosting became dry. I piped the frosting on each cupcake and topped it with chocolate and colorful sprinkles.
I wasn't expecting the party to be big. I didn't eat any cupcakes because there were not enough for everyone! I could tell the guests liked them just by the look of their faces.
November 25, 2010
Bread and Butter
One night a few weeks back, I was browsing the net looking for a good whole wheat bread recipe when I chanced upon this video on youtube. The show was all about healthy bread. I went to the main website and hurriedly searched for whole wheat bread and found it in a snap. The demo was done by this guy who has been baking for 35 years. I watched the baker in awe. My tummy growled as the flour began to take shape. For each procedure , he gave a thorough explanation. And that made every step easier for me.I am not a bread baker but a pastry chef who wants to develop and refine my skills in baking bread so all minute details are essential to my learning process. I had this itch to try it right away but I couldn't as I didn't have the ingredients needed. I took the trip to a nearby supermarket as soon as I had my breakfast the next day.
Here's what you need for the recipe. Olive oil, sea salt, dry yeast, whole wheat flour , warm water and syrup.
November 4, 2010
Parsley and Mickey
My niece Parsley turned 2 on Sunday. I volunteered to make her favorite Disney character Mickey cake. I baked the chocolate sponge cake in advance and kept it in the fridge for three days before carving it. Chilled sponge cake saved me a lot of effort in carving.
I used a different frosting this time. The main ingredient I used was white chocolate. I melted it with a half cup of butter and a quarter cup of cream and milk mixture. I chilled the mixture ( I monitored it all the time) before I whipped it. I added a bit of cream and milk mixture while whipping until I got the right consistency. The result - everyone asked for second helping. Twas a hit!
October 28, 2010
Lightning Mc Queen
My friend asked me to make Lightning McQueen cake for her son's 2nd birthday.
I used two kinds of cake. Sponge cake for the base and pound cake for the car because pound cake was easier to carve even without chilling it first. The frosting was Wilton inspired. First, I coated the base with white icing. Then I made the "road" by covering almost the entire surface of the cake with black icing, leaving a small part on each side for the "grass". I piped the "grass" on the sides. I placed the 3D car cake on top and coated it with red icing.
It was my first time to make a 3D cake. I would say it wasn't easy. Took me 6 hours to finish, (well I'm an amateur cake decorator). Except for the smudge due to poor handling (not my fault) I was delighted it turned out good.
My Birthday Celebration
When a family friend learned of my birthday last weekend, he didn't hesitate to take my family to eat at his favorite restaurant he'd been raving about. I can't remember how long ago I had Mediterranean food. But I do remember how good it was. So when he said we're gonna go to Beirut Restaurant in Ploenchit, I did not protest.
We started with Greek Salad - Lettuce, black olives, tomatoes,cucumber, and Feta cheese.
October 24, 2010
Jurassic
My sister asked me to make a dinosaur cake for her school's Dinosaur-themed Party. I have not done any carving for the cakes I made. So I was a bit excited to try it out.
Sponge cake would be difficult to carve so I settled for a butter cake. I doubled the recipe to have enough for the body, head and tail. I cut the cake horizontally. I carved the body from one cake; the tail and head out of the other. For the frosting, I added Green Apple food color to the white chocolate buttercream. I used Smarties for the scales, eye and toes, Hershey's kisses for the spine, and melted white chocolate for the teeth. The kindergartners went gaga over it. It was delicious too.
September 14, 2010
World Gourmet Festival
The 11th World Gourmet Festival at Four Seasons Hotel is a seven-day event, higlighting the works of renowned chefs from 7 different countries each day. Among all the events, I chose the Afternoon Tea which featured the creation of the famed Pastry Chef Gale Gand. Meeting the pastry chef whom I'd been looking forward to meet and indulging myself for the wonderful food were truly an unforgettable experience.
Water cress cream and poached quail egg on brioche.
September 8, 2010
Foodland International Food and Beverage Festival
Last Saturday, I attended Foodland International Food and Beverage Festival. As I arrived I was surprised to see an attendance of people from all walks of life. I did my polite Thai greeting to the people at the entrance and proceeded.
The first thing I noticed was the big cake at the end of the table. I took my camera out of my purse and SNAP!.
August 16, 2010
My First Catering Job
In December 2009, Chef Willy informed my class that his former employer, a French Restaurant called Lenotre was in need of Kitchen staff for a gala at the French Embassy. With a reputation of providing the best food and service to its customers, Lenotre has become famous in catering business. Two hundred guests were invited to the gala including Princess Soamsavali and her entourage.
My friends and I signed up for this one-day job. As a kitchen staff, I learned that one must undertake any task assigned to her. From carrying stacks of china, doing dishes, reheating, plating to cleaning the kitchen. All these I had to do. Me and my friends were too focused on doing our tasks that we didn't even notice that we'd been standing for hours and hours. We enjoyed the fun of preparing the finest food there was that day. It was a great privilege working with the French Team. It's something I'll never forget. And I sure did learn a lot.
Foie gras with red radish, beet root and beans.
My friends and I signed up for this one-day job. As a kitchen staff, I learned that one must undertake any task assigned to her. From carrying stacks of china, doing dishes, reheating, plating to cleaning the kitchen. All these I had to do. Me and my friends were too focused on doing our tasks that we didn't even notice that we'd been standing for hours and hours. We enjoyed the fun of preparing the finest food there was that day. It was a great privilege working with the French Team. It's something I'll never forget. And I sure did learn a lot.
With the Chefs. Even after a longgggg busy day, we still managed to smile for the camera.
These salmon mousse-filled pastries melt once you pop them in your mouth.
Foie gras with red radish, beet root and beans.
Lobster bisque with scallops
the main course
August 2, 2010
Le Cordon Bleu Graduation
After nine months that seemed eternity, my hardships have paid off. I have finally achieved my goal of becoming Le Cordon Bleu Dusit Culinary School's newest alumna. No more rushing in the wee hours of the morning to get to school on time. No more wearing white uniforms. No more eating cakes which give bulges around my stomach. No more late classes. BUT....but .....I will miss the life at the culinary school, the fun in making cakes and desserts, the friendship, the people who unknowingly have inspired me to do the best I can in continuing the legacy of Le Cordon Bleu.
Nine months is over but my journey has just begun...
July 18, 2010
Cake Exam
This cake exam is based on the Doceur Chocolat Blanc Et Fruits Rouge. The cake was judged according to the criteria the pastry chefs had formed namely unique design, taste: no frozen mousse and compote, (just so you know, we use mousse not buttercream to create gateaux style cakes) and technique.
My initial plan was to make a round cake but as time went by, I heard so many students talked about how easy a round cake is to handle and decorate so I figured there would be so many of that kind. Design was the primary aspect of the exam cake. I wanted to present something different but this would mean changing everything I roughly designed. After a series of inquiries, I got the suggestions and advice from different chefs. The new design came out nice. To top it off, my cake was praised for being the ONLY cake that wasn't frozen.
I passed!
June 26, 2010
Sugar Showpiece Exam
Today our skills on sugarwork were once again tested. Contrary to what I have said before, I now enjoy sugarwork and was able to make better looking flowers and sugarballs for my showpiece. I wish we had more lessons on this as I have come to take pleasure in doing it.
The decorations for the showpiece are made from water, sugar and glucose heated at 160-162 degrees Celcius. Tartaric acid is added when the syrup reaches 155 degrees celcius . To stop the temperature of the syrup from rising, it is plunged in ice water. The syrup is poured into SILPAT to let it cool a bit. When the edges have cooled off, the folding starts. When it has stabilized ( this means it doesn't spread out easily) , the cooked syrup is rolled and pulled many times until it becomes shiny. This process is called Satinage.
The base is also made from the same mixture but without Tartaric Acid as this will soften the candy syrup if added. It is cooked at the same temperature as the pulled sugar.
The syrup being cooked.
Workshop 27
Workshop 27 - Pulled and Poured Sugar
A total of five hours were given to us to finish our decorations (pulled sugar) and base (poured sugar). I was in high spirits today that I was able to make more pulled sugar decorations than last time. Today's workshop is just to assess our skills on sugarwork in preparation for our sugar showpiece exam tomorrow.
I wasn't aiming for pink but many drops of red dye and a few of blue turned my cooked sugar to this. You can't exactly know how the shade might turn out but try to experiment with different colors until you acquire the color you desire.
Here's the base before I stick the decorations. Nice eh?
Practicals 24-26 Sugarwork
Practical 26 - Blown Sugar
On the third day of sugarwork, my arms began to strain. I would say sugarwork is my least favorite as I have to deal with heat all the time and exert double efforts to get things done. I have no complaints on cooking the syrup. Handling and blowing the sugar are what make it wearisome.
I kind of enjoyed what we did today because it reminded me of my childhood. As a child, I loved blowing plastic balloons and creating them in different shapes. Blown sugar is somewhat similar with plastic balloons in a sense that air gives its shapes.
How to blow a sugar? Cut off a small amount of sugar/ cooked syrup with scissors. Shape a ball by folding the edges towards the center.Press the edges slightly together. Be sure to leave a small hole where you insert the metal part of sugar blowing pump. Wrap a small piece of sugar around the metal part and heat it with blow torch. (This will stop the air from escaping when pumped.) Insert the metal part and close the edges, pump air into the sugar SLOWLY or it will explode. While pumping, push the bottom side of the sugar up with scissors. This will expand the sugar. For other shapes, pull the opposite side of sugar and expand it while pumping until you form any shape you can imagine..
My class during presentation.
Practicals 22- 23 Pastillage and Marzipan
Practical 23 - Pastillage
Pastillage is a mixture of icing sugar, cornstarch, gelatine and a bit of vinegar or lime juice.
The mixture becomes a hard and dry block. Kneading it a bit to make it nice and smooth is necessary before use. To ease the kneading and to moisten it, just add lard (We used duck's fat) until it reaches the right consistency.
The finished product. The chef actually liked the idea. |
Practicals 19 - 21 Chocolate Showpiece and Chocolate Box
June 15, 2010
SP Practicals 17 & 18 Chocolate Bars and Chocolate Bonbons
Practical 18 -Preparation Des Interieurs De Chocolats ( Preparation of Chocolate Interior)
A series of lessons on chocolate made me appreciate it more. Not only because I learned the methods of tempering all kinds of chocolate but also because I got the first hand experience of making this wonderful food most of us can't live without.
Today's practical was a continuation of yesterday's. Both recipes yield good "eating" chocolate due to the fact that majority of the ingredients are of the best quality transported from afar.
Here are my chocolate bars |
June 6, 2010
SP Practicals 15-16 Berlingots and Mielina
SP Practicals 13-14 Restaurant Plated Dessert
Practicals 13-14 Restaurant Plated Dessert
This was a combined practical to make up for the classes we missed because of the chaos in Bangkok. I will be writing more about these recipes later. I have a project I am working on (related to my exam cake) and it takes much of my time.
Light Cream Cheese
This was a combined practical to make up for the classes we missed because of the chaos in Bangkok. I will be writing more about these recipes later. I have a project I am working on (related to my exam cake) and it takes much of my time.
Light Cream Cheese
May 28, 2010
SP Practicals 10-12 Dessert in Glass, Macarons
Practical 12 - Transparence De Cremeux Chocolat, Blondies,Framboise Et Son Croustillant De Grue De Cacao ( Transparence of Creamy Chocolate, Blondies, Raspberry with Cocoa Bean Crisps)
The long name says it all. This recipe is one of the series of restaurant desserts we are learning at the moment. The only thing that complicates the process is decoration which requires a lot of patience, time and creativity. Just so you know, our chefs encourage us to make grandiose decoration for all kinds of desserts.
Any glass is acceptable as long as it adds effect to what you want to present.. For this pratical, we used martini glass.You can see through the glass the order of the things inside.
The creamy raspberry was poured in, followed by diced blondies and raspberries, a tempered chocolate disk, a layer of creamy chocolate mousse over it, and the chocolate glaze.
May 13, 2010
SP Practicals 7-9 Cakes and Eskimos
Practical 9 - Eskimo Citron Et Fruits De Bois ( Lime and Wild Fruits Eskimo)
A modern version of popsicle, Eskimo is made from lime mousse with wild fruits coulis filling, chilled in a tube to obtain it's cylindrical shape.
The base consists of sweet pastry and hazelnut cream biscuits cut in rectangular shape the length of Eskimo.
A modern version of popsicle, Eskimo is made from lime mousse with wild fruits coulis filling, chilled in a tube to obtain it's cylindrical shape.
The base consists of sweet pastry and hazelnut cream biscuits cut in rectangular shape the length of Eskimo.
May 12, 2010
SP Practicals 4- 6 Cakes
Practical 6 - Delice Chocolat Pistache Et Framboise ( Pistachio and Raspberry Chocolate Delight)
The heart -shaped base was made from chocolate macaroon. The edge was filled with chocolate mousse and the center with pistachio flavored creme brulee.
May 8, 2010
SP Practicals 1-3 Tartlet , Baba and Club Sandwich
April 26, 2010
Superior Patisserie (SP)
After a bit interruption due to the rally last week, Le Cordon Bleu reopened today. I am now in the last leg of my journey to a new profession - pastry chef. I was glad to see old friends but also sad that my partner and good friend Cha postponed classes because of the current political situation in Thailand. There is no assurance we're gonna see each other again in 3 months. She and I had a good work relationship. As I sat in class this afternoon, I felt I was missing someone.
Chef Fabrice presented four recipes for starters. They were Club Sandwich Tropical, Macha Green Tea Cake, Florentin and Mini Apricot and Passion Fruit Cake. We're doing Club Sandwich Tropical for practical tomorrow. Stay tuned.
April 20, 2010
Le Cordon Bleu Graduation
LCBD Graduation
Bangkok, Thailand
We have finally come to the end of yet another three months of hardwork. Le Cordon Bleu Graduation was held at Dusit Thani Hotel on April 1, 2010. Only six of us in Intermediate Patisserie class 3 came to the event. Although half of the class were missing, we still had a wonderful time together.
With Biboy and Cha. We're the only Filipinos at Le Cordon Bleu Dusit this term.
Practical 29 and Demo 30 Sucre Tire (Pulled Sugar)
March 31, 2010
Practical 27 & Workshop 28 Breadmaking and Yule Log
Practicals 25-26 Feuille D' Automne (Autumn Leaf) and Cassis Vanille (Blackcurrant Vanilla)
Practical 26 - Feuille D' Automne (Autumn Leaf)
Basic components of this cake were 3 chocolate meringue disks and chocolate mousse. The disks were arranged in layers. Each layer was covered with chocolate mousse. The whole cake was then wrapped with a band made from melted chocolate. The top was covered with chocolate fans.
What are bands and fans? You might wonder. They are 58% chocolate melted in a bowl placed over simmering water ( Bain marie as the French say). When the chocolate reached 50 degrees celcius, it was poured in to a tray and spread out until the entire surface of the tray was covered. (If using a cookie sheet, use its backside). The chocolate was chilled to set. Once the chocolate became firm, it was removed from the chiller and was left at room temperature to soften. How soft? Soft enough that when you scrape it you don't feel any resistance.
A 3-layered cake, sides decorated with fans...made by Chef Willy. His fans were way better than mine.
Practicals 19-21 Tresor Vanille Framboise,Plaisir and Douceur Chocolat
Practical 21 - Tresor Vanille- Framboise ( Raspberry and Vanilla Treasure)
Vanilla Chiboust cream on top of raspberry mousse. Icing sugar was sprinkled on the sides. Raspberries were used in decoration.
Another recipe that called for an almond dacquoise base. Layers of raspberry mousse and vanilla chiboust cream were arranged on top of each other , each was shaped into a dome. The top was caramelized and glazed.
Tip: Make sure the raspberry mousse is firm enough before covering it with vanilla chiboust cream.